Not long ago we replaced the light in the kitchen to new LED lamp.
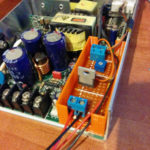
On the next morning we discovered that the LED driver is creating a lot of noise and blocking the commercial radio stations.
I started looking for solutions and many people suggested using a filter to block the noise, the popular filter turned to be some kind of metal piece salvaged from power supply.
The only problem is that I didn’t want to install anything that isn’t approved by the local standards institution due to safety and insurance issues.
After digging more on the internet, I found this video by Andreas Spiess where he tested many options including ESP8266.
In the end he went with the ESP32 Radio project by Edzelf.
Ed did a great work building this enormous project.
What’s in my build?
If you go with this project, you can choose how you want to build it.
It’s very modular and you can decide if you want LCD screen, SD Card reader for playing MP3, Rotary encoder etc.
The initial thought was to use LCD but later I ditched the idea and chose to use only IR receiver.
Since the stations will be fixed on the remote control, I don’t really need to know what’s playing right now.
Building and testing
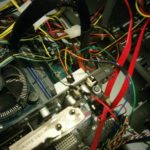
After connecting all the jumper wires as shown on the table in the documentation I tried to configure it.
I’m not sure why but I messed something and it didn’t work, later I understood that the config file needs to be flashed separately from the code so take a few minutes to read the instructions properly.
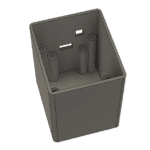
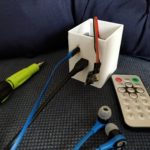
The system worked without any problem so I went to design small box for it.
My target was to make a box with small footprint.
The boards were scanned on the scanner to get reference pictures in order to draw it on Fusion 360.
It turned out to be good idea but with boards that has components on both sides it makes the scan blurry (it needs to be flat on the glass to get good image).
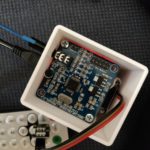
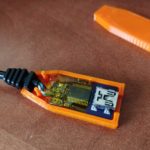
Fitting everything inside the box was pretty easy (I missed the holes of the ESP32 but it was secured by the force of the audio board above).
The second testing was done when everything was inside but I encountered issues, the audio was choppy and something wasn’t right.
In the end I found that the jumper wires were the culprit, probably too long (I think Andreas mentioned it in his video) so I soldered short wires directly to the boards.
Everything worked as intended.
Except one thing.
When connecting the ESP32 Radio to speakers the audio was not clean and a humming was present, very annoying.
Took it out of the box and no humming.
I was confused for a few days but in the end I realized that the hole for the 3.5mm plug wasn’t big enough so the ground lug didn’t touch the contact on the socket.
After drilling a bigger hole everything was working again.
In the end, I think it’s very fun project to build and not expensive.
Guess what happened when I finished building it?
On the very same day that I finished building this project (took almost a year due to time constraints) the LED driver died and the lamp was replaced with new and silent driver.
What a weird coincidence…
We use cookies on our website to give you the most relevant experience by remembering your preferences and repeat visits. By clicking “Accept All”, you consent to the use of ALL the cookies. However, you may visit "Cookie Settings" to provide a controlled consent.
This website uses cookies to improve your experience while you navigate through the website. Out of these, the cookies that are categorized as necessary are stored on your browser as they are essential for the working of basic functionalities of the website. We also use third-party cookies that help us analyze and understand how you use this website. These cookies will be stored in your browser only with your consent. You also have the option to opt-out of these cookies. But opting out of some of these cookies may affect your browsing experience.
Necessary cookies are absolutely essential for the website to function properly. These cookies ensure basic functionalities and security features of the website, anonymously.
Cookie
Duration
Description
cookielawinfo-checkbox-analytics
11 months
This cookie is set by GDPR Cookie Consent plugin. The cookie is used to store the user consent for the cookies in the category "Analytics".
cookielawinfo-checkbox-functional
11 months
The cookie is set by GDPR cookie consent to record the user consent for the cookies in the category "Functional".
cookielawinfo-checkbox-necessary
11 months
This cookie is set by GDPR Cookie Consent plugin. The cookies is used to store the user consent for the cookies in the category "Necessary".
cookielawinfo-checkbox-others
11 months
This cookie is set by GDPR Cookie Consent plugin. The cookie is used to store the user consent for the cookies in the category "Other.
cookielawinfo-checkbox-performance
11 months
This cookie is set by GDPR Cookie Consent plugin. The cookie is used to store the user consent for the cookies in the category "Performance".
viewed_cookie_policy
11 months
The cookie is set by the GDPR Cookie Consent plugin and is used to store whether or not user has consented to the use of cookies. It does not store any personal data.
Functional cookies help to perform certain functionalities like sharing the content of the website on social media platforms, collect feedbacks, and other third-party features.
Performance cookies are used to understand and analyze the key performance indexes of the website which helps in delivering a better user experience for the visitors.
Analytical cookies are used to understand how visitors interact with the website. These cookies help provide information on metrics the number of visitors, bounce rate, traffic source, etc.
Advertisement cookies are used to provide visitors with relevant ads and marketing campaigns. These cookies track visitors across websites and collect information to provide customized ads.


 DIY Shortened Vertical Antenna
 Controlling Somfy blinds with ESP8266
 AllStar to DMR bridge
 Repeaters Frequency Calculator
 Accessing LAN over ZeroTier easily
 Using The QYT KT8900 for an Allstar node
 Building APRS Digipeater with Raspberry Pi
 DIY Magnetic Loop – Part 1 – The Capacitor
 AllStar Node using the Baofeng 888
 Callsigns instead of node numbers on Allstar