Callsigns instead of node numbers on Allstar If you have an Allstar node you…
How to control an Allstar Node with Google Assistant

How to control an Allstar Node with Google Assistant
The Idea
I got a message from Rich 4X1DA saying that he wants to give me an Amazon Echo Dot to play with it.
He mentioned that someone on YouTube made a video which shows how to control an Allstar node with Amazon Alexa.
So he sent me this video by Eric N3FIX:
After watching this video I thought that it’s good idea but I had a different way in my mind to achieve it, simple and easy one.
Use cases
I think most of the people who use Allstar link start with simplex node.
The disadvantage of simplex node is that it limits your control via DTMF, you can send commands only when there’s no transmit on the node.
If someone is chatting on your node, you can’t control it unless you use IAXRPT.
Another case is if you don’t have DTMF microphone on your radio.
Controlling with voice command will solve those issues.
Amazon Alexa or Google Assistant?
My smart home devices are connected to Google Home ecosystem so I wanted to check if it’s possible to do it with my Google Home Mini.
The way Eric did it was great but it required additional software and Raspberry Pi.
I wanted to check if IFTTT will help me get the same result in easier way.
And it did.
(If you’re not familiar with IFTTT, it’s an automation tool).
After connecting my Alexa to IFTTT I checked the options on the service page and compared it with what Google Assistant offers.
I found one thing that tipped the scales to Google’s side.
Google offers a number argument in the process which means that when talking to Google assistant, you can say keywords and numbers and IFTTT will send those arguments to your code.
It gives the ability to receive node number from the user so there’s no need to code each and every node in the script.
The Code
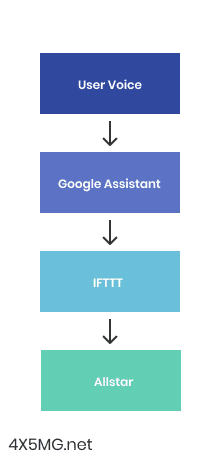
The main idea is to use IFTTT to send web request through Webhooks to custom code running inside the Allstar Raspberry Pi.
Easier than installing software on the RPi because we use only one PHP file.
WARNING:
This is not a secure way to control the node, if the URL is compromised it can expose your node to unauthorized control.
I’m using HamVoIP Version 1.6-12 image.
The code was written in PHP because the image usually has PHP installed for the Allmon2 service.
First, you’ll need to create new file under /srv/http/
Let’s call it google.php
You can call it whatever you want, just remember the name.
Now paste this code inside:
<?php

// Your node number
$mynode = '43546';

// Getting the data
$command = htmlspecialchars($_GET["command"]);
$node = htmlspecialchars($_GET["node"]);
$secret = htmlspecialchars($_GET["secret"]);

if ($secret === "YOUSECRETCODE") {
    // Debugging
    echo $command."</br>";
    echo $node."</br>";

    // Removeing spaces from the node number
    $node = preg_replace('/\s+/', '', $node);

    // Executing connect sequence and logging to file
    if ($command === "connect") {
        $txt = $node;
        exec('sudo asterisk -rx "rpt fun '.$mynode.' *3'.$node.'"');
        $myfile = file_put_contents('logs.txt', $txt.PHP_EOL, FILE_APPEND | LOCK_EX);
    }

    // Executing disconnect sequence and logging to file
    if ($command === "disconnect") {
        $txt = $node;
        exec('sudo asterisk -rx "rpt fun '.$mynode.' *1'.$node.'"');
        $myfile = file_put_contents('logs.txt', $txt.PHP_EOL, FILE_APPEND | LOCK_EX);
    }
}
?>
Let’s explain a little bit about the code.
In $mynode, we declare our node number then on the next part we receive the arguments from IFTTT and Google Assistant.
In this case, we have 3 arguments:
Command
Node
Secret
The command can be either Connect or Disconnect in this case.
Node is the node number that we use the command for.
Secret is password that we need to choose in order to minimize the risk of unauthorized control.
IFTTT
The first step is to connect your Google Asisstant to IFTTT, search for Google Assistant in the services and connect it.
You can go through the steps here and look in the pictures for reference.
- Go to IFTTT and create new recipe.
- Search for Google Assistant.
- Select “Say a phrase with a number”.
- In the first field type the command you want, I chose “Connect to #”
When the # represents the number coming from the user. - In the 4th field type the response of Google Assistant.
- Create Trigger.
- Click on the “That” text.
- Search for Webhooks.
- Choose “Make a web request”.
- In the URL type your IP (you’ll need to do some port forwarding) or domain, for example:
http://mydomain.com/google.php?secret=YOURSECRETCODE&command=connect&node= - Click on “Add ingredient” and choose NumberField.
That will add the node number. - Choose GET in method and you’re done.
If you want to do the disconnect, just follow the steps again and change the command in the URL.
P.S. the arguments are case sensitive.
That’s it.
Now you can talk to your Google Home device and control your node.
The code can be expanded for other command as well.
Also, with the routines feature in Google Home app you can even schedule connection to nodes.
73!


